Merge#
Use the Merge node to combine data from two streams, once data of both streams is available.
Major changes in 0.194.0
This node was overhauled in n8n 0.194.0. This document reflects the latest version of the node. If you're using an older version of n8n, you can find the previous version of this document here.
Merge mode#
You can specify how the Merge node should combine data from different branches. The following options are available:
Append#
Combines data from both inputs. The output contains items from Input 1, followed by all items from Input 2.

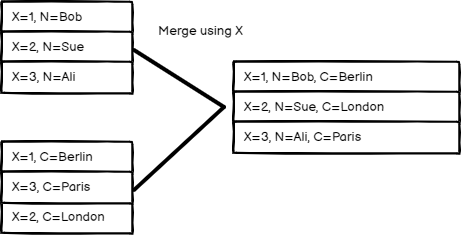
Merge by fields#
Compare items by field values. Enter the fields you want to compare in Fields to Match.
n8n's default behavior is to keep matching items. You can change this using the Output Type setting:
- Keep matches: merge items that match.
- Keep non-matches: merge items that don't match.
- Enrich Input 1: keep all data from Input 1, and add matching data from Input 2.
- Enrich Input 2: keep all data from Input 2, and add matching data from Input 1.
Field value clashes#
If both items at an index have a field with the same name, this is a clash. For example, if all items in both Input 1 and Input 2 have a field named language, these fields clash. By default, n8n prioritizes Input 2, meaning if language has a value in Input 2, n8n uses that value when merging the items.
You can change this behavior:
- Select Add Option > Clash Handling.
- Choose which input to prioritize, or choose Always Add Input Number to Field Names to keep all fields and values, with the input number appended to the field name to show which input it came from.
Multiple matches#
Matching by field can generate multiple matches if the inputs contain duplicate data. To handle this, select Add Option > Multiple Matches. Then choose:
- Include All Matches: output multiple items (one for each match).
- Include First Match Only: keep the first item, discard subsequent items.
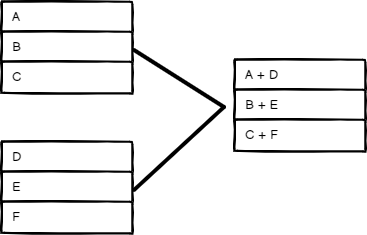
Merge by position#
Combine items based on their order. The item at index 0 in Input 1 merges with the item at index 0 in Input 2, and so on.
Inputs with different numbers of items#
If there are more items in one input than the other, the default behavior is to leave out the items without a match. Choose Add Option > Include Any Unpaired Items to keep the unmatched items.
Field value clashes#
If both items at an index have a field with the same name, this is a clash. For example, if all items in both Input 1 and Input 2 have a field named language, these fields clash. By default, n8n prioritizes Input 2, meaning if language has a value in Input 2, n8n uses that value when merging the items.
You can change this behavior:
- Select Add Option > Clash Handling.
- Choose which input to prioritize, or choose Always Add Input Number to Field Names to keep all fields and values, with the input number appended to the field name to show which input it came from.
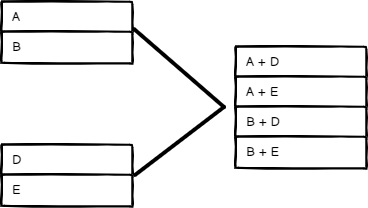
Multiplex#
Output all possible item combinations, while merging fields with the same name.
Field value clashes#
If both items at an index have a field with the same name, this is a clash. For example, if all items in both Input 1 and Input 2 have a field named language, these fields clash. By default, n8n prioritizes Input 2, meaning if language has a value in Input 2, n8n uses that value when merging the items.
You can change this behavior:
- Select Add Option > Clash Handling.
- Choose which input to prioritize, or choose Always Add Input Number to Field Names to keep all fields and values, with the input number appended to the field name to show which input it came from.
Choose branch#
Choose which input to keep. This option always waits until the data from both inputs is available. You can keep the data from Input 1 or Input 2, or you can output a single empty item. The node outputs the data from the chosen input, without changing it.
Merging branches with uneven numbers of items#
The items passed into Input 1 of the Merge node will take precedence. For example, if the Merge node receives five items in Input 1 and 10 items in Input 2, it only processes five items. The remaining five items from Input 2 aren't processed.
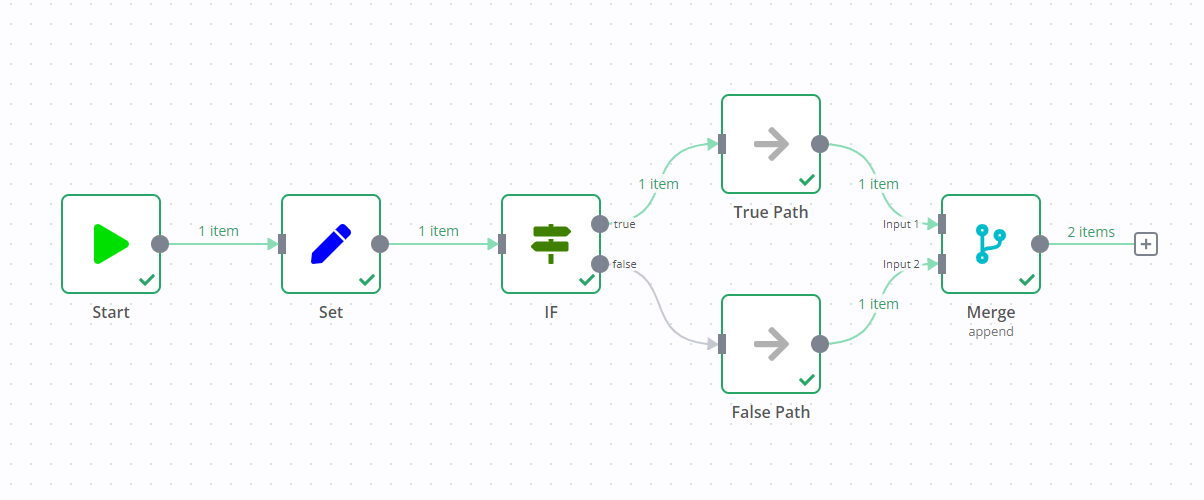
Branch execution with If and Merge nodes#
If you add a Merge node to a workflow containing an If node, it can result in both output branches of the If node executing.
The Merge node is triggered by one branch, then goes and executes the other branch.
For example, in the screenshot below there's a workflow containing a Set node, If node, and Merge node. The standard If node behavior is to execute one branch (in the screenshot, this is the true output). However, due to the Merge node, both branches execute, despite the If node not sending any data down the false branch.
Try it out: a step by step example#
Create a simple workflow with some example input data to try out the Merge node.
Set up sample data using the Function nodes#
- Add a Function node to the canvas and connect it to the Start node.
- Paste the following JavaScript code snippet in the JavaScript Code field:
 1
 2
 3
 4
 5
 6
 7
 8
 9
10
11
12
13
14
15
16
17
18
19
20
return [ { json: { name: 'Stefan', language: 'de', } }, { json: { name: 'Jim', language: 'en', } }, { json: { name: 'Hans', language: 'de', } } ]; - Add a second Function node, and connect it to the Start node.
- Paste the following JavaScript code snippet in the JavaScript Code field:
 1
 2
 3
 4
 5
 6
 7
 8
 9
10
11
12
13
14
return [
	  {
    json: {
      greeting: 'Hello',
      language: 'en',
    }
  },
  {
    json: {
      greeting: 'Hallo',
      language: 'de',
    }
  }
];
Try out different merge modes#
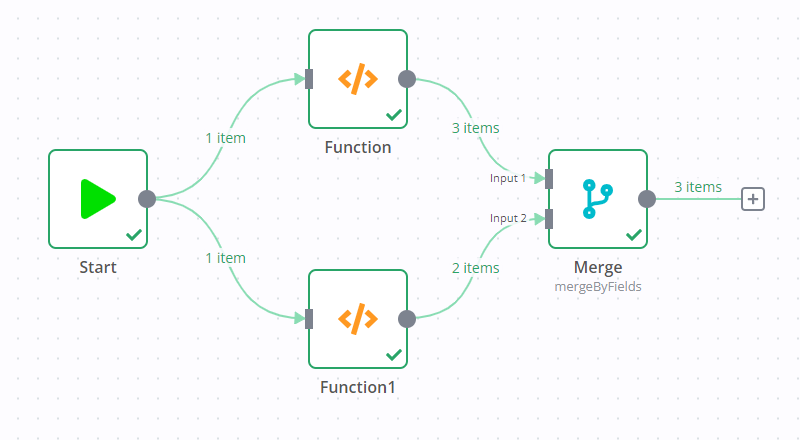
Add the Merge node. Connect the first Function node to Input 1, and the second Function node to Input 2. Run the workflow to load data into the Merge node.
The final workflow should look like the following image.
Now try different options in Mode to see how it affects the output data.
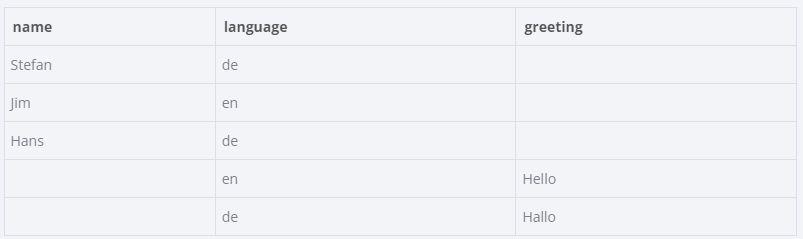
Append#
Select Mode > Append, then select Execute node.
Output data in table view:
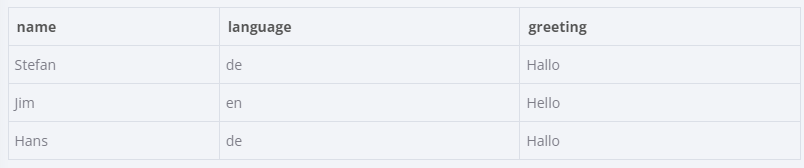
Merge by fields#
You can merge these two data inputs so that each person gets the correct greeting for their language.
- Select Mode > Merge By Fields.
- In both Input 1 Field and Input 2 Field, enter
language. This tells n8n to combine the data by matching the values in thelanguagefield in each data set. - Select Execute node.
Output in table view:
Merge by position#
Select Mode > Merge By Position, then select Execute node.
Default output in table view:

Keep unpaired items#
If you want to keep all items, select Add Option > Include Any Unpaired Items, then enable Include Any Unpaired Items.
Output with unpaired items in table view:

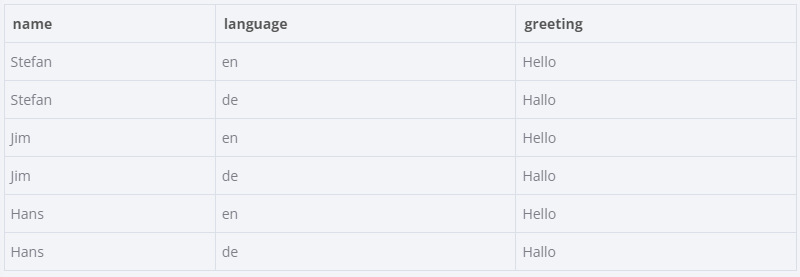
Multiplex#
Select Mode > Multiplex, then select Execute node.
Output in table view:
Try it out: load a workflow#
n8n provides an example workflow that demonstrates key Merge node concepts.
Go to Joining different datasets and select Use workflow to copy the example workflow. You can then paste it into your n8n instance.